

We’ve had security cameras in the past but this one will work outside and you can’t move it around automatically. Yes, it’s a “proper” security camera. Now, many of you will probably think that you need some sort of recording hardware and other bits to make this work, but not so.
OK sure, you can use an network video recorder (NVR) to record multiple IP cameras, and Reolink (the people who sent us this) do those too. However, this works by itself and you can connect to it via a smartphone app too. This is the RLC-410 4MP Fixed Lens PoE Security IP Camera and you can bag one on Amazon for £79.99 with free delivery.

It’ll work in three different ways. Choose how you want to use it..
– Independently – It’ll upload movement via FTP or as an attachment via email. You can view a live image via a smartphone or PC app. You can get push notifications on your phone too.
– With a computer – A PC-based app will record images 24/7.
– With an NVR – This will record from multiple cameras into a standalone box.
For this review, I chose the standalone option and used my phone for controlling and setting up.


In the box you get a CD with the software and drivers on if you intend to use your computer, some screws to fix the camera to a wall, a quick start guide, a waterproof lid, some ethernet cable, a mounting template and a surveillance sign that you can stick on your house so that people are aware that you’re watching the property. The camera itself is made from a reassuringly weighty metal with a small lip over the front of the lens to protect the lens from the rain. It really feels like a quality bit of kit – solid, cool metal.
It’s fitted with lots of IR sensors and will actually operate via power over ethernet. To be honest I’m probably one of many people who don’t have a router or switch providing power over ethernet. If you can get one then it’s better because it means that there’s less cables going through your wall. One cable versus the two that I’m going to be using here. Don’t worry though, because a supplier power adaptor in the box will come to your rescue.
If we have a look at the cables dangling out of the back of the camera we’ll find this…

There’s one for your ethernet cable, one for the power (if you need it like I do) and a reset switch, which is rather convenient because you can reset it without having to clamber up too high to reset it.
First up then, you need to take that mounting template out and stick it up on the wall. This will let you know where the holes are for the camera screws…

I stuck it on the wall with some tape and then used a drill to get the holes in the correct place.
Next up, you need to make a hole for the cables. For me, due to the need for power, I needed to decide where the camera was going to go in relation to an electrical socket. You can use an extension lead of course, but it’s a whole lot tidier to use power over ethernet if you want to invest in this. For me, the power lead and the ethernet cable needed to be “presented” outside. You don’t necessarily have to do this of course, but in my case I had a standard ethernet cable and the power cable pushed through this hole..

The ethernet cable I had in the box wasn’t long enough to get back to my broadband router, so I used a few of these female to female connectors which basically let you plug lots of ethernet cables into each other. You can also just go ahead and buy some lengthy ethernet cables off the t’interwebs. It’s all fairly easy to do it yourself.


Now, if you do have the ends of the cables outside your property like this, you’ll need to protect them with the waterproof lid supplied or some waterproof tape. I did the latter and then tucked them behind some of the fascia to make it a bit neater.

I should at this point just show you this really quick video which highlights how easy it is to point the camera. You have a fair amount of tilt and rotation, meaning that you can direct the camera manually and then keep it locked in place thanks to the supplied allen key.
OK. Then it’s just a matter of flicking on the supplied power adaptor and checking that you have connectivity on your router or switch. If you have additional cameras they just need adding in a similar way, but before you get off your ladders, make a note of the barcode on the side – this will be needed by the app that you can download.
The app is available for Android or iOS and lets you see your camera feed anywhere in the world. If, of course, you’re using your mobile data connection you might want to keep an eye on the streaming data usage, but it’s an easy-to-use app which is really friendly and simple to “get”.

First of all, you’ll need to connect it to the camera itself. To do this you’ll need to hit “Add” and then simply point your phone at the QR code I mentioned a moment ago on the camera. That, I must say, is it. You can repeat the process for multiple cameras, adding up to 16 around your home or premises. It’ll also let you interface with an NVR and playback recordings from that if you have one.


Want to record footage? You can do that ad-hoc with the app and it’ll save footage to your phone. Likewise, you can capture images from the phone too and, if your camera supports it (this one doesn’t) you can tilt and pan the camera. It will let you zoom in, but only digitally on the footage. You can control the stream quality – making the footage “smoother” or sharper.

You can dive deeper too, adjusting the frame rate, maximum bitrate and more.
What’s perhaps more helpful is the alarm and settings options, which let you control settings to do with the email, on-screen display and motion detection.

For me the email setup was a tad tricky because I use Gmail and the outgoing mail server needed authentication. A bit of Googling quickly got me the right settings though, and I can choose whether to attach the image to sent emails and how often to send them. There’s also timeframes when you’d like to have the camera monitoring movement. Ideal if you’re looking at perhaps your driveway or garden and you know that there’ll be expected movement between certain times or on certain days. I chose only to have the camera checking for movement between midnight and 6AM, and you can adjust the sensitivity too.

However, as for further settings – especially FTP – you might need to start looking at the PC app as I couldn’t find a way to set this on my Android handset.

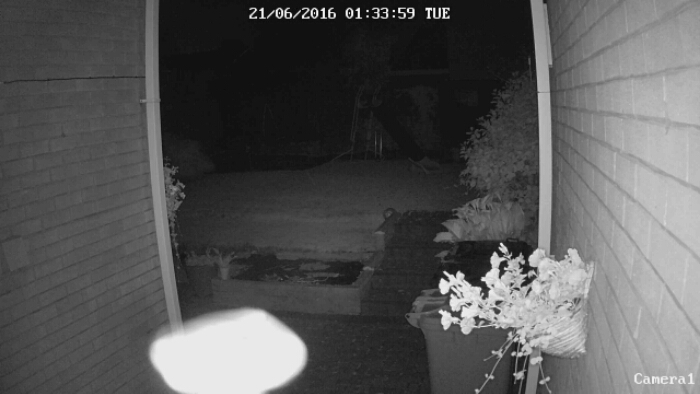
The resulting images from my motion triggers overnight were PLENTIFUL on the first few nights. It got slightly worse when a spider created a web across the front of the lens and it triggered like crazy most of the night. The only solution was to get a brush up onto the web and then perhaps think about re-positioning the camera or adjusting the sensitivity down. The tine, date and camera name is added but you can adjust the name …
Overall
Provided you ensure that the stream setting is correct (I put mine onto “Clear”), this produces very good images from the 4 megapixel camera and the IR went quite some distance in my garden to light up the grass some 30 metres away. The setup was quick, simple and easy. The build and even the quality of the rawl plugs that went into the wall was very decent indeed.
I was worried that the app was going to let this down, but it really didn’t. It was a very straightforward app with a friendly interface and a simple GUI, although I did struggle somewhat to understand the sensitivity options (I ended up just putting it up and up until it didn’t capture moths and spiders).
Once I had it setup though, it was all good. A solid, reliable camera with an excellent resolution and it worked well through lots of heavy rainstorms. The only thing I kinda wanted was a longer ethernet cable in the box. It was a tiny 1 metre one, which wasn’t much use.
Get more details on the Reolink website or get one from Amazon USA ($74.99) or Amazon UK (£79.99).